NOTE
These are SAMPLE instructions for kits designed to convert gasoline engines to LPG and
natural gas. Actual instructions will vary with engine type and size.
CONVERSION KIT SAMPLE INSTALLATION INSTRUCTIONS

GENERAL INFORMATION
PLEASE READ THE ENTIRE INSTRUCTION PROCEDURE BEFORE
ATTEMPTING TO COMPLETE THE INSTALLATION
The gaseous fuel conversion kits have been designed to provide a basic set of equipment to convert an internal combustion engine to gaseous fuel. Most of the conversions can be accomplished in 30-40 minutes using common hand tools. There are a few instances where an electric drill or threading equipment are needed.
As an aid to installation, this procedure is divided into four parts. The first section concerns the actual conversion of the carburetor. The next section concerns proper placement of the zero governor. This is followed by a series of diagrams showing the recommended piping for various types of systems. The last section details a procedure for first time starting and normal operation.
Although most of the kits are designed for a particular engine model, there is always a chance that because of the specific engine application the conversion cannot be installed as the instructions show. If There appears to be no alternate way to install the kit, either write or call us as we may be able to recommend how to modify the kit or suggest another set of equipment.
! WARNING ! THE STANDARD KITS AS SHIPPED CONFORM TO THE NATIONAL FIRE PROTECTION ASSOCIATION (NFPA) PAMPHLET 58 REQUIREMENTS FOR USE OF GASEOUS FUELS AS A MOTOR FUEL OUTDOORS. IF THE CONVERTED ENGINE IS TO BE HOUSED IN AN ENCLOSURE OR USED INDOORS, ADDITIONAL EQUIPMENT IS REQUIRED TO POSITIVELY SHUT OFF THE FUEL SUPPLY IF THE ENGINE SHOULD FAIL WHILE UNATTENDED. ADDITIONALLY, IF ANY MODIFICATION OF THE PIPING SYSTEM FROM THE ZERO GOVERNOR TO THE FUEL SUPPLY IS REQUIRED, CONSULT THE LOCAL GAS SUPPLIER OR THE MOST RECENT COPY OF NFPA PAMPHLET 58. FOR A COPY Of PAMPHLET 58, WRITE THE NATIONAL FIRE PROTECTION ASSOCIATION, BATTERY-MARCH PARK, QUINCY, MA 02269 |
! CAUTION ! (1) Thread sealing compound should be used on all pipe thread fittings between the zero governor and the fuel supply, being careful not to get any inside the fittings. This could allow excess compound to collect on valve seats and orifices and cause hazardous leakage and poor performance. (2) If copper Tubing is used, it should be "K" or "L" having a minimum wall thickness of 0.032 inches. (3) After piping is complete, turn on the fuel supply and use a soap solution to check all fittings for leaks. |
CARBURETOR CONVERSION
The installation procedure for the carburetor section is detailed on an enclosed sheet. After completion of this procedure continue with the next section.
ZERO GOVERNOR MOUNTING
PLEASE READ THE FRONT PAGE WARNINGS
The Zero Governor should be located according to the recommendations included with it. If this sheet is not available, please follow the following suggestions.
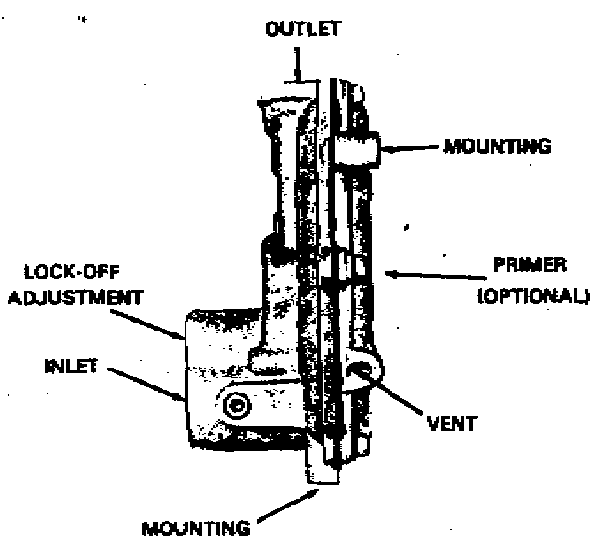
The Zero Governor should be mounted as close to the carburetor as possible with the diaphragm oriented in a vertical plane. This helps to minimize the effects of gravity on diaphragm travel. The unit should also be placed for easy access to the lock-off adjusting screw and primer if provided.
Refer to the piping diagram for the recommended piping system; and before installing the fuel supply line, be sure that the gas pressure is no more than the maximum inlet pressure shown on the cover of the zero governor. If the pressure is greater, leakage could result in a fire hazard and or hard starting.
Flexible piping to the inlet should be used to prevent cracking from vibration if the zero governor is mounted on the engine or other vibrating surface. Also piping to the inlet should be of sufficient size to allow full flow to the zero governor. This is very important in natural gas installations as any restrictions smaller than the zero governor orifice can affect engine performance. If a solenoid valve is used ahead of the zero governor in the low pressure line, it should have an orifice at least as big as the orifice in the zero governor.
When an electric solenoid primer is used, follow the wiring and adjusting instructions furnished separately.
Select and install the outlet fitting into the zero governor taking care not to allow any dirt to enter the outlet. Some zero governors may already have a fitting installed at the factory.
After installation of the fuel hose between the zero governor and the carburetor, turn on the fuel supply and test the system for leaks at the pipe joints using a soap bubble solution or suitable gas detection device.

MODEL KN
INSTALLATION & OPERATION
GENERAL
The KN is designed for sensitivity and simple operation, It is used with low pressure vaporized gaseous fuels, where dependable starting is a requirement. Because of its extreme sensitivity, the KN offers excellent results in most remote starting applications (standby power generators, etc.). With proper installation and maintenance, the KN will provide years of trouble free service.
! WARNING ! The KN should be installed and maintained per instructions and all applicable federal, state, local laws and codes, and NFPA Pamphlet 58. SPECIAL NOTE: For indoor installations by NFPA definition, an atmospheric zero governor is not considered a positive shut-off valve and an approved automatic shut-off device shall be installed to assure that the flow of fuel will be stopped should the engine fail while unattended. For or a copy of Pamphlet 58, write the National Fire Protection Association, 470 Atlantic Ave., Boston, Mass. 02110. |
OPERATION
The KN is an atmosphere zero governor which acts like the float and needle valve in a gasoline carburetor. Air flow through a venturi in the carburetor creates a vacuum which acts through the outlet of the KN on the diaphragm. Atmospheric pressure then forces the diaphragm toward the vacuum, depressing the lever and pulling the valve seat away from the orifice which allows fuel to flow as long as the demand persists. When the vacuum ceases, a spring force pushes on the lever and forces the valve seat against the orifice shutting off the fuel flow. It is important to remember that fuel should not flow through the KN when the engine is not running.
A properly adjusted KN requires a vacuum of only 0.25" to 0.35" of water column to start the opening sequence. Due to this sensitivity, most installations do not need priming to start unless low cranking speeds or restricted and lengthy piping are required. If priming is necessary and a manual primer is installed, use only 1 or 2 second bursts of fuel and immediately try to start the engine. If there is a choke on the carburetor, do not use it as this will probably cause flooding and hard starting. As you can see, the operation of this unit is simple and basic. If you are having trouble operating the engine, in most cases the fuel controller is NOT malfunctioning. There is generally a problem with the engine or fuel supply so do not make adjustments or attempt to service the KN until you are sure it is needed.
SERVICE
The KN should be periodically checked for leakage past the valve seat and the vents on the cover kept clean and free of obstructions. If the KN needs service we suggest you take it to a qualified serviceman. If that help is not available we will furnish you a list of repair shops or the proper service information.
INSTALLATION
The KN should be mounted as close to the carburetor as possible with the arrow on the cover pointing up and the diaphragm in a vertical position. This helps to minimize the effects of gravity on diaphragm travel. The unit should also be placed for easy access to the primer if provided.
There are two sets of mounting holes provided. Either set of mounts will adequately support the KN. The bottom set of holes have a 1-3/4" bolt spacing for use with all universal mounting brackets. The mounting bosses on the cover are spaced (5-3/4") apart for use with 5/16 bolts.
Before installing the fuel supply line, be sure that the gas pressure is no more than the maximum inlet pressure shown on the front of the KN. If the pressure is greater, leakage could result in a fire hazard and or hard starting. The piping to the inlet should be of sufficient size to allow full flow to the KN. This is very important in natural gas installations as any restrictions can effect engine performance. If a solenoid is used ahead of the KN in the low pressure line, it should have an orifice at least as big as the orifice in the KN. Flexible piping to the inlet should be used to prevent cracking from vibration if the KN is mounted on the engine or other vibrating surface.
NOTE: Thread sealing compound should be used on all pipe thread fittings between the KN and the fuel supply tank, being careful not to get any inside the inlet or fittings. Excess compound could collect on the seat and orifice and cause hazardous leakage, resulting in poor performance. After piping is complete, turn on the gas and use a soap solution to check all fittings for leaks.
If an electric solenoid primer is used, follow the wiring and adjusting instructions furnished separately.
The KN outlet is 3/8 NAT and I an outlet fitting has not been provided, select and insert a suitable vapor fitting taking care not to allow any chips or dirt to enter the outlet. Use of street ells or conventional pipe fittings in the fuel line between the KN and the carburetor is not recommended as they may restrict the flow of fuel.
After installation of a properly sized fuel hose between the KN and carburetor, it you are installing a complete conversion return to the instructions. For field replacement applications the unit is ready for service.
SETTING POWER ADJUSTMENT
The following are the steps needed to set the power adjustment.
The power adjustment is like the main jet on a gasoline engine but is adjustable. It is located on a elbow with an adjusting bolt and a lock nut. The power adjustment is best placed near the adapter but if there is no room then it can be placed on the outlet of the regulator.
Start by turning it in till it bottoms then turning it out 2 turns and try to start engine. Turn screw out (1/4) turn at a time until the unit starts. Once engine starts place a load the engine that equals the load that will be placed on engine under hard use.
While engine is now running and under hard load perform the following to set the
power adjustment.
A. Turn the power adjustment screw counter clock wise until there is a power loss
or drop in RPM.
B. Turn the power adjustment screw clock wise until power or RPM is regained,
continue to turn the power adjustment screw clock wise until you again have a power or RPM
loss.
C. Turn the power adjustment screw counter clockwise until you regain the lost
power or RPM.
D. The power adjustment is now set and should not need further adjustment.